Fixed: Bluetooth Mouse Keeps Disconnecting on Windows 11
We all know how important a mouse is for any PC. So, we won’t bore you by talking more about it. Cutting the case, recently users have experienced their Bluetooth mouse keeps disconnecting on Windows 11. The issue was not only experienced with Bluetooth mouse but also wired ones.
After a deep dive to search and find the causes of the issue, three reasons popped up. There was a booting error, Power Management System disabling the device, and more.
While the issues are there, mostly the mouse getting disconnected is easily fixed by a single restart. However; those who experienced their mouse disconnected after the restart then they will need to apply the following methods to fix it.
Table of Contents
Reasons Mouse Keeps Disconnecting on Windows 11
Before fix the issue let’s know what causes it. This way, we can avoid it in the future. These are the reasons why your Bluetooth mouse keeps disconnecting on Windows 11 and even Windows 10.
- Computer Boot Error- while your boot your Windows 11, a lot of tasks are performed behind the scene. And sometimes, you won’t the system can’t find the device. The device can’t be found, as it is not running at all. If the power to your system has been cut while your system was shutting down then can cause the issue.
- Connection Error- maybe the device connected to your system is not connected correctly. Not having a proper connection to a PC can cause the Bluetooth mouse to get disconnected. As the device is disconnecting and then reconnecting, again and again.
- Power Management System- this is a new inbuilt feature of Windows 11. The Power Management System is created to end tasks with high power consumption. While other times, the feature ends useless tasks. But now, it is killing Bluetooth devices due to power consumption.
- Corrupt Drivers- one of the last reasons of Bluetooth mouse keeps disconnecting on Windows 11 is corrupt, or faulty drivers. Either the drivers are infected by malware or virus from third parties or you have downloaded it from unreliable sources. No matter which one is the reason, it has affected your driver and now is causing the issue. You can also experience the issue due to outdated drivers or installing the wrong drivers on your PC.
Numerous other reasons are there which can cause mouse connection errors on Windows 11. But these are the most obvious ones and we will use the methods below to fix them.
Related: Windows 10 Bluetooth Is Turned off- Enabled Quickly
How to fix Bluetooth Mouse Keeps Disconnecting on Windows 11

Like we mentioned above, before applying any of the methods below, give your Windows a restart. If the issue got fixed then good else you will begin by updating your driver.
1- Update driver on Windows 11
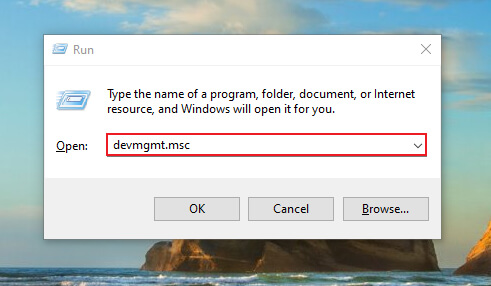
For this method, we will open the RUN application from the Start menu.
Then we will type “devmgmt.msc” and click on OK.
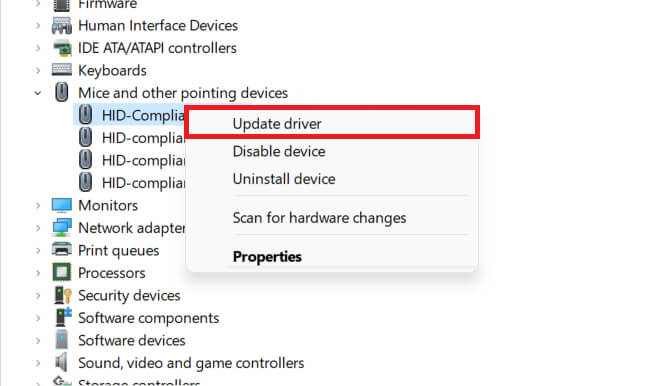
Navigate down and find Mic and other pointing device, and click on expand. Now right-click on it and select Update Driver.
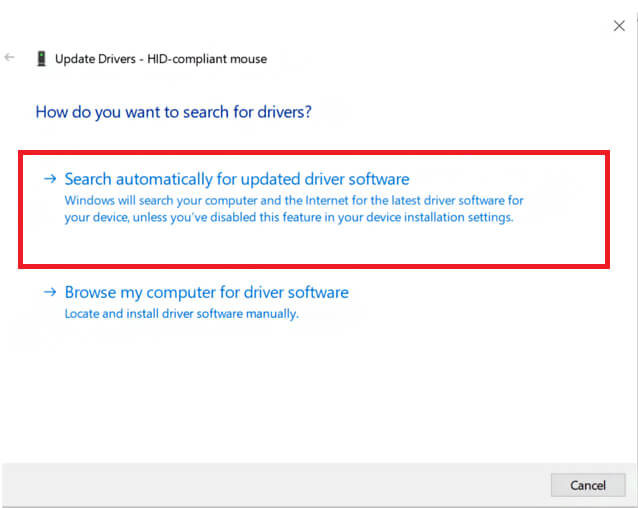
The “How do you want to search for drivers?” window will pop up on your screen. Here you will have two options; click on Search automatically for updated driver software.
Soon it will check for any updates. If there was an update then it will download it for you. Once the file is downloaded, you will be asked for permission and then the installation will begin.
For this method, you can also use third-party applications such as IObit uninstaller. If this method fixed the Bluetooth mouse getting disconnected on Windows 11 then you will continue with your Windows 11. Else you will apply the next method.
2- Uninstall Bluetooth Mouse Driver
The second method is to uninstall Bluetooth mouse drivers on your Windows 11. This way, you will also delete all the faulty files inside the Bluetooth mouse driver folder.
Begin by selecting RUN from the Start menu.

Then you are going to type “devmgmt.mcs” to open Device Manager.
Inside the Device Manager, you will find and select Bluetooth mouse device. Right-click on it and then click on Uninstall Device. Click on OK.
Restart your Windows 11. While your system starts again, you will connect your Bluetooth mouse to your system again and this way Windows 11 will begin the installation of the driver. Any new device drivers detected on Windows 11 will be installed automatically.
3- Disable Windows Power Management
Here will disable the Windows Power Management feature for Mouse. This way, the feature can’t be disabled it.
Start the process by typing “devmgmt.msc” in RUN.
Device Manager will appear. Navigate down and find Bluetooth mouse, double click on it, and select Properties.
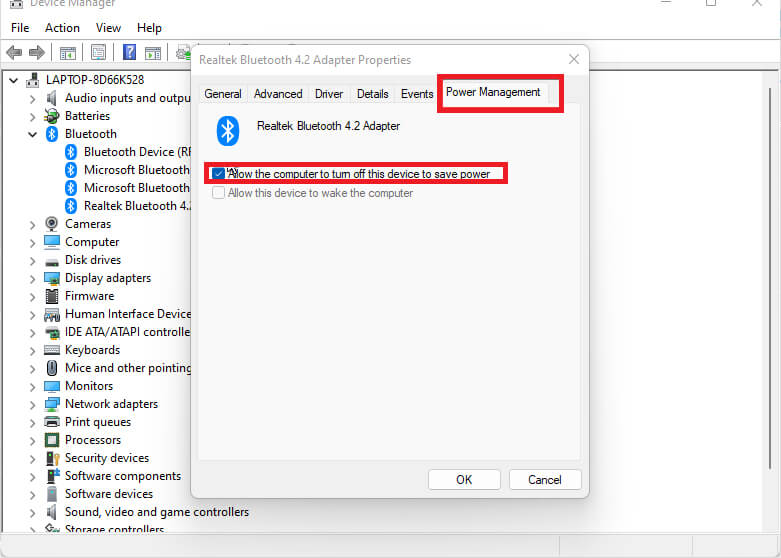
Inside the Properties, you will select the Power Management tab then uncheck the Allow the computer to turn off this device to save power option. Click on OK and give your Windows a restart.
Now check again if still Bluetooth mouse keeps disconnecting on Windows 11 or not. If you are still experiencing the issue then you are recommended to use the other two methods left.
4- Run Windows Bluetooth Troubleshooter
If the method above can’t fix your mouse connection issue then you are going to use the troubleshooter to fix it. Users who are having any sort of issue will be either fixed with a troubleshooter or the issue will be displayed on the screen.
Which can be later followed and fixed. So, let’s begin to troubleshoot Bluetooth Mouse on Windows 11.
For this, you are going to Settings > System > Troubleshoot. Now you will find Other troubleshooters and click on them.

Here you will find Run Bluetooth troubleshooter, click on it.
The system will begin to detect any error and if found then will fix it. If you are experiencing the issue even after the troubleshooting, then you are going to check your Windows version. Other than any physical issue, the only reason you are having the Bluetooth mouse getting disconnected is bugs or errors on Windows 11. By updating your Windows, you can fix this issue.
5- Update Windows 11
And the last way to fix the issue is to update your Windows. For updating your Windows 11, you can use inbuilt options or tools provided by Microsoft.
First, we will use the inbuilt option to download updates for Windows 11. Open the Start menu and find Settings.
Then we will find Windows Update, click on Check for updates. The system will check for any available updates and begin to download them.
Once the update is downloaded then you will install it on Windows 11.
You can also use tools such as Windows Update Assistant or Windows Media Creation Tool. These are the official tools provided by Microsoft to download updates for both Windows 10 and Windows 11. You can download them to your system.
Then run and download update files for your Windows. once they are downloaded, you install them on your system.
