Windows 7 Installation: Install Windows 7 from the USB
Tired of dealing with slow and outdated installation methods for Windows 7? It’s time to upgrade to USB and experience a faster and more convenient installation process. By using a USB drive to install Windows 7, you experience a hassle-free and smoother installation.
Windows 7 is a robust and user-friendly operating system that has been widely used and loved by many since its release in 2009. It is a widely used and well-loved operating system known for its simplicity, stability, and compatibility with older hardware. While Microsoft has discontinued its support, many users still prefer Windows 7 over newer versions. If you’re one of them, this guide will show you how to install Windows 7 from a USB drive, providing you with a quick and easy way to upgrade your system.
Table of Contents
Installing Windows 7 from USB in three simple steps

Create a bootable USB drive: You will need to create a bootable USB drive using a tool like Rufus or Windows 7 USB/DVD Download Tool. You will also need to have a valid Windows 7 ISO file.
Boot from the USB drive: Insert the USB drive into the computer where you want to install Windows 7 and restart the computer. Access the BIOS settings and change the boot order so that the computer boots from the USB drive first.
Install Windows 7: Once you have booted from the USB drive, the Windows 7 installation process will begin. Follow the on-screen instructions to install Windows 7 onto your computer.
Step 1: Create a bootable USB of Windows 7

Creating a bootable USB drive for Windows 7 is a straightforward process that requires a few simple steps. To begin, you’ll need a USB drive with at least 4GB of storage space and a valid Windows 7 ISO file. You can download Windows 7 ISO file here.
Next, you’ll need to download and install a tool like Rufus or Windows 7 USB/DVD Download Tool, which will guide you through the process of creating a bootable USB drive. We have already demonstrated creating a bootable USB.
Once the tool is installed, simply follow the on-screen instructions. Begin by selecting the USB drive as the destination, and choose the Windows 7 ISO file. The tool will then format the USB drive and copy the necessary files to create a bootable USB drive for Windows 7.
Step 2: Boot Windows OS from USB
To boot an OS from a USB drive, you’ll need to perform a few basic steps.
Firstly, it’s essential to configure your computer’s BIOS to boot from USB. Restart your computer and press the relevant key, usually F2 or Delete, to access the BIOS settings. Navigate to the boot options and adjust the boot order to prioritize USB drives over the hard drive.
Check BIOS Settings
To check your system BIOS, follow these steps:
- Restart your computer
- During the boot-up process, you’ll need to press a specific key to access the BIOS settings. This key may vary depending on your computer manufacturer. The most common keys include F2, Delete, F10, or ESC. Look for a message on the screen during startup that says “Press [key] to enter setup” or consult your computer’s documentation to find the specific key for your model.

- You enter the BIOS settings; you’ll see a menu with various options. You can use the arrow keys to navigate through the options and the Enter key to select and change settings.
- Here you will find Boot or boot sequence and make USB as the first option.
- After you’ve made any necessary changes, be sure to save them and exit the BIOS. To do this, look for an option to “Save Changes and Exit” or press the F10 key to save changes and exit the BIOS settings. Be careful not to make any changes that you’re not sure about, as incorrect settings can cause problems with your system.
As the computer restarts, it should detect the USB drive and initiate the boot process. Follow the instructions displayed on the screen to install the Windows OS now.
NOTE: Don’t forget to revert the boot order settings to their original configuration after the installation to avoid booting from USB every time you start the computer.
Step 3: Installing Windows 7 from USB
From here on, you are going to do the installation on your PC.
Choose language and other preferences: Select your language, time, currency format, and keyboard or input method, then click Next.

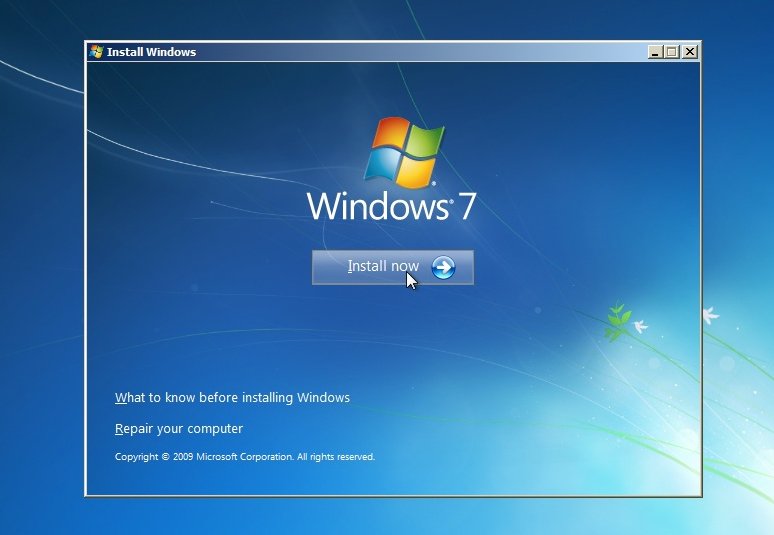
In “Install now:” Click on Install now to begin the installation process.
Enter your Windows 7 product key when prompted, then click Next. If you don’t have a product key, you can choose to install Windows 7 without one, but it will only work for 30 days.
Accept the license terms: Read and accept the license terms and click Next.
Choose the installation type: Select the installation type you want. You can choose to upgrade your existing installation or do a custom installation. Select Custom (advanced) to perform a clean installation.
Select the drive and partition where you want to install Windows 7, then click Next. If the partition you select contains data, you’ll be prompted to confirm that you want to delete it.
NOTE: Selecting delete will remove all the personal files and applications inside the driver.
Windows 7 will now begin installing. This process can take anywhere from 20 minutes to several hours, depending on your system’s speed and the installation options you selected. Wait for the installation to complete.
Once the installation is complete, you’ll be prompted to create a user account and set up your computer’s name and password.
After you log in for the first time, Windows 7 will automatically search for and install any available updates and drivers for your system.
That’s it! You’re now ready to use your newly installed copy of Windows 7 that was installed using a USB drive.

