Free Download Latest Android ISO for Virtual Box and VMware
If you want to use Android on your desktop environment or enjoy the idea then you stick with us till the end, as we are going to show you “How to install Android on Virtual Box” with the direct links to download Android ISO for virtual Box for free.
You might be familiar with Android 12(API 31) which is currently the latest version of Android. No matter it is Android 12 or any later version, to use the OS on your desktop you will need to download Android-X86.
Before we continue to Android-x86; the first-ever Android was released in November 2007 and was available on retail in September 2008 by Open Handset Alliance which is financially supported by Google.
Now to Android-x86. Android-x86 is an open-source application used to run Android OS on Intel x86 or AMD powered systems. Android-x86 is the same as any other Android OS, except it is used for desktop uses.
It was developed by Chi-Wei Huang and YI Sun in 2009. You can use the Android-x86 file to use Android on your desktop.
To run Android on your PC, you will need to download Android-x86 from the direct links below and virtualization software.
Software as VMware Workstation or Virtual box can do the work. you can also use Hyper-V by enabling it on your Windows 10.
Table of Contents
Android-x86 is for?
If you enjoy the idea of using Android on your Windows or want to use a single Linux-based OS on your devices, then Android-x86 is for you.
Download Android ISO for Virtual Box

Android-86 is an open-source app licensed under Apache Public License 2.0. To download the Android (ISO) file, the officials have hosted them on the Git server.
32-Bit
MD5 – 2326e81ebfc026e4846cf1d79cc83d42
SHA-1 – f0fd92b97b4c5f894c2caf59df38886b4427e57f
64-Bit
MD5 – 6009d161b8cd9c2f44aabbd07e982ad0
SHA-1 – d3d5072924dc636bc7547eec123aaca86ab9a992
If you want to download Android Pie in ISO for your Virtual Box, then these links will help you:
SHA256: 2eb9b5030a7bf8f8f1a06258b4a73619dba7578c186ac1d3db371c04432836e8
SHA256: 808e1f086a2d7677c623b6765748910c1dd68bd36a79efdce1501d8dc6fe5ef1
Requirements to run Android on PC
You will need Windows XP or better as your host OS. If you are using Linux, then Fedora 11 or better is good. 4GB RAM (8GB for improved performance) memory with 8GB free storage file is needed.
How to install Android on Virtual box?
Here how to install Android on your Virtual Box. The process is simple and requires no rocket science education to perform. Follow these steps:
1- Download Virtual Box and Android ISO image
First, you will need to download both Virtual Box and Android-x86 ISO images. You can download the Android ISO image from the above and Virtual Box here. Once you have downloaded Virtual Box, you will install it on your system. Now, that Virtual Box is installed, you will need to restart your system and run Virtual Box as admin.
Free download Virtual Box for Windows
2- Create Virtual Machine for your Android
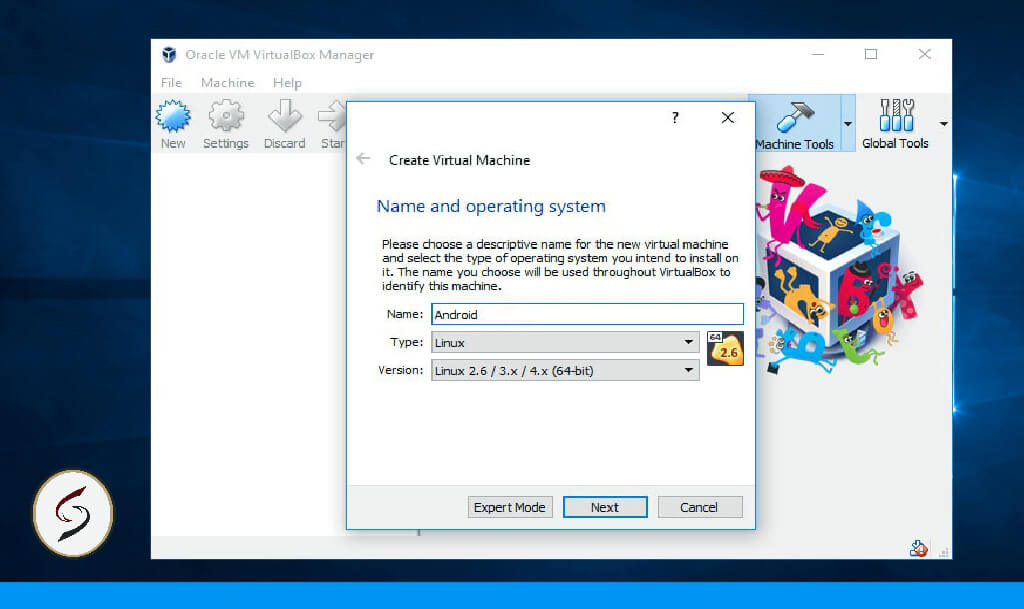
A welcome screen will appear once you open the app. Click on Next and proceed. Here you will need to create a virtual machine which by clicking on Create Virtual Machine, there you will need to provide the Name (can be anything), Type (which is Linux), and Version (select any latest one).
3- Memory size and hard disk type
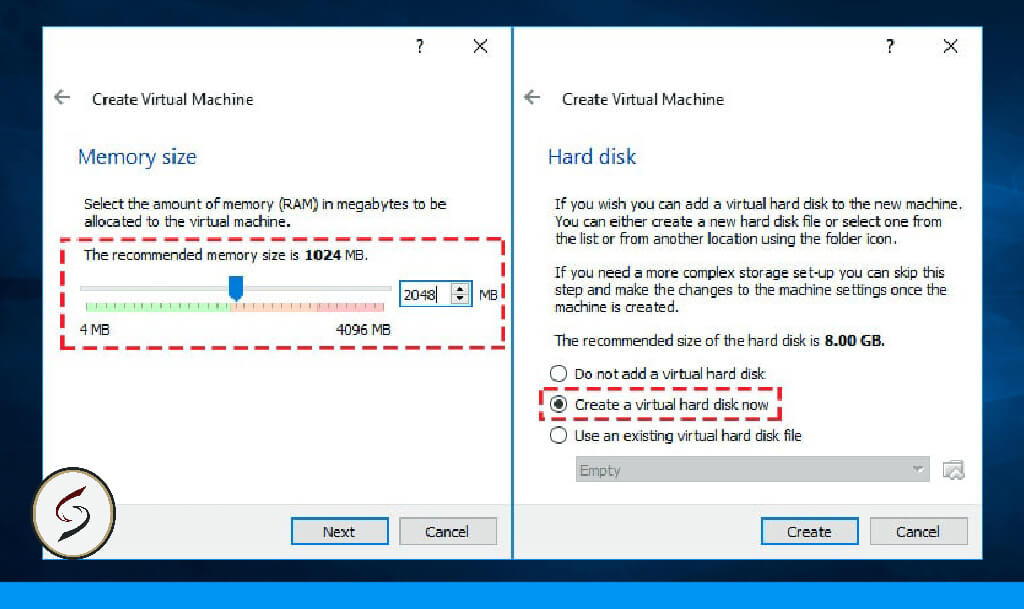
In this step, you will be asked for RAM memory and hard disk type that you want to allow the guest OS. As for RAM memory, 2GB is enough. When you will reach the Hard Disk you will need to create a virtual hard disk now.
This will open a new window where you will be asked for the type of storage. You can select VDI (Virtual Box Disk Image) virtual storage and for physical hard disk, choose Dynamically allocated.
4- File Location and Size
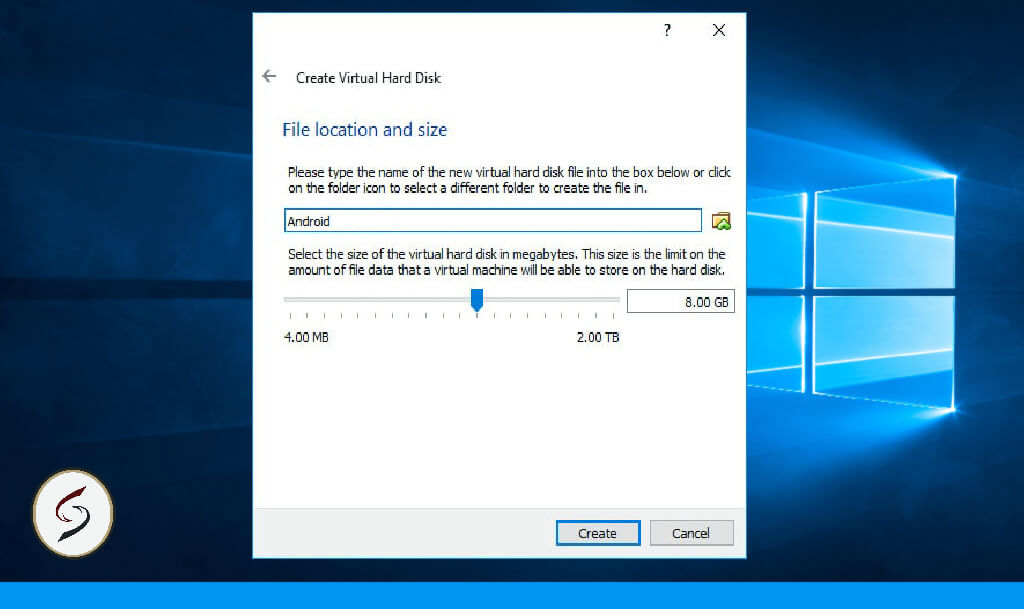
In this step, you will be asked where to create your VM (virtual machine) and the amount of storage you want to give it. Clicking on the box icon will help you to select any other folder whereas, moving the meter will increase or decrease the storage size. While creating the VM, it may take some time, so be patient.
5- Select Android ISO file
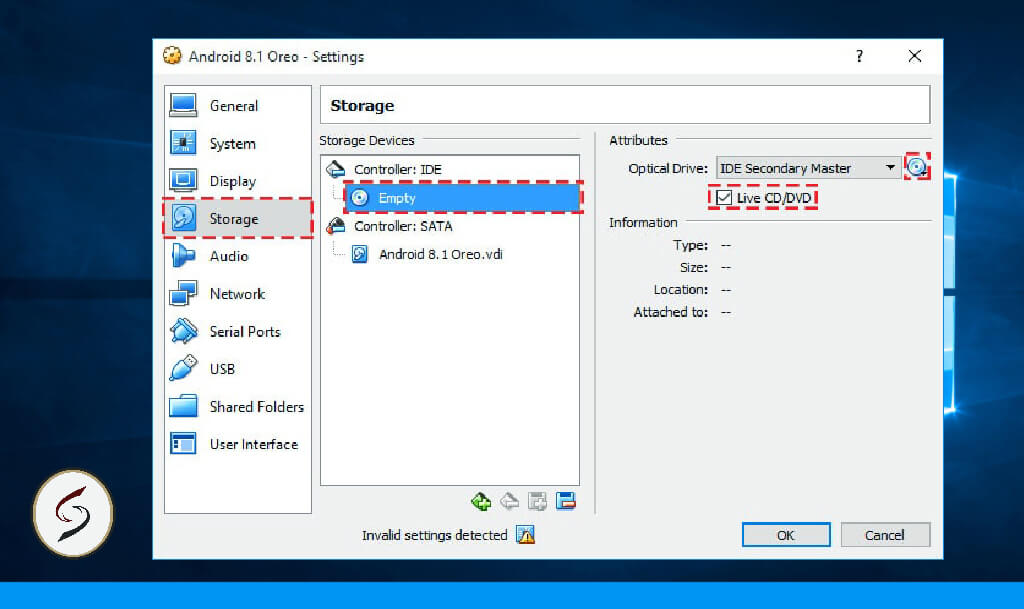
Now, you will need to select the Android ISO file in your virtual box. Go to the left side of your screen and click on Settings. Inside the Storage section, you will see the Empty below the Controller: IDE. Select it, on the right side click on the CD icon.
Find the ISO file of Android-x86 and select it. Don’t forget to turn on Live CD/DVD then click on OK. To make it short Settings> Storage > Empty > select the file > OK.
6- Configure Graphics
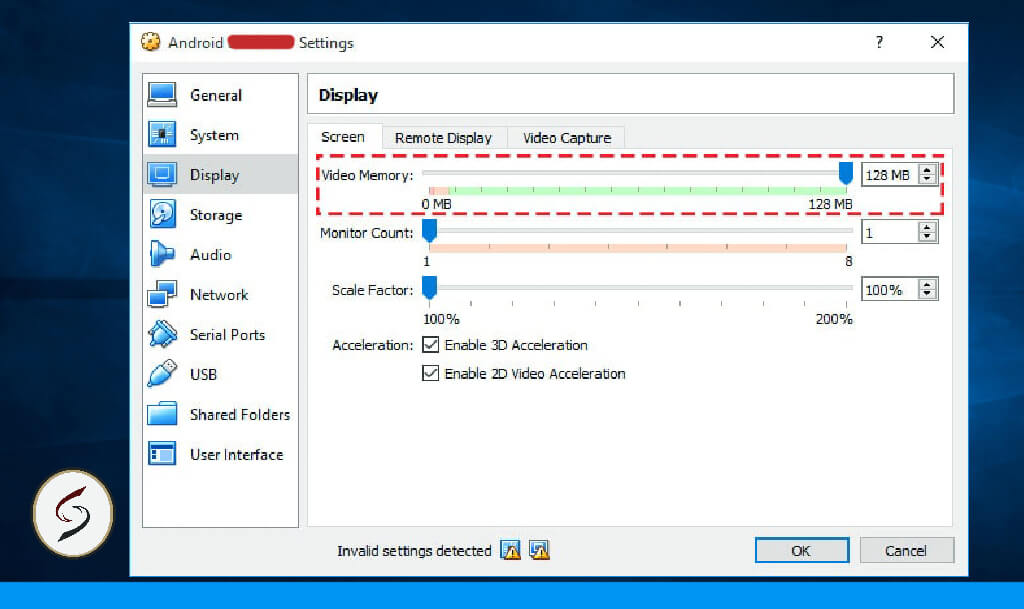
You will be moved to Display. The video memory should be provided; you can select the amount according to you. From 1 MB to 2GB VRAM (if you have a graphic card) can be selected. Other options as Monitor Counts, Scale Factors are also present which need to be selected accordingly.
Don’t forget to tick mark Enable 3D acceleration and Enable 2D video acceleration.
7- Start Virtual machine and select advanced options
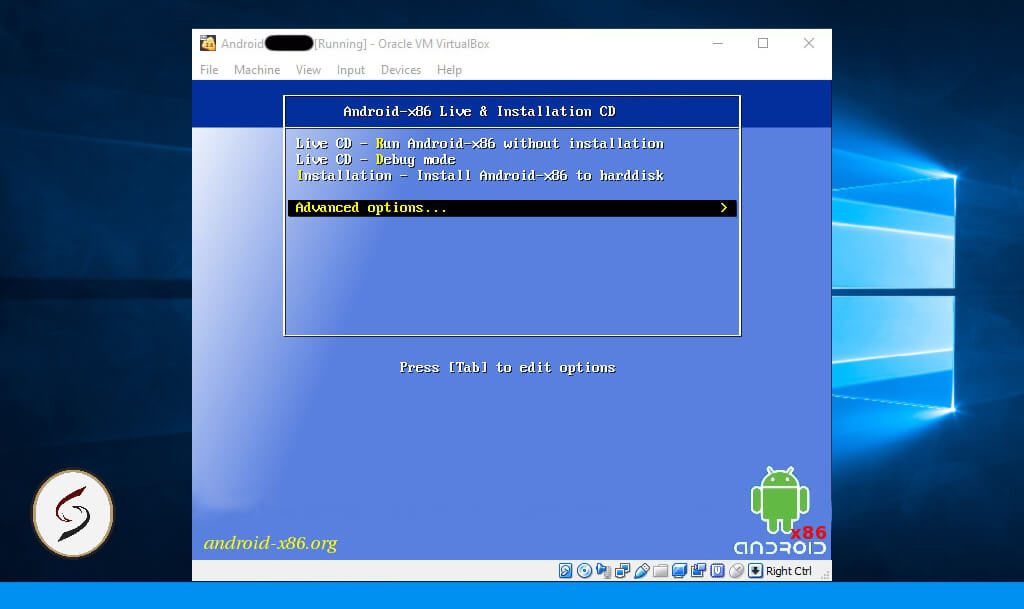
All the configurations are made. So, here is the time to use the app. To start the virtual machine by clicking on Start. Once the VM start four different options will be provided:
- Live CD-Run Android-x86 without installation
- Live CD-Debug mode
- Installation-Install Android-x86 to hard disk,
- Advanced options…
Select the Advanced options… for the next step.
8- Auto Installation
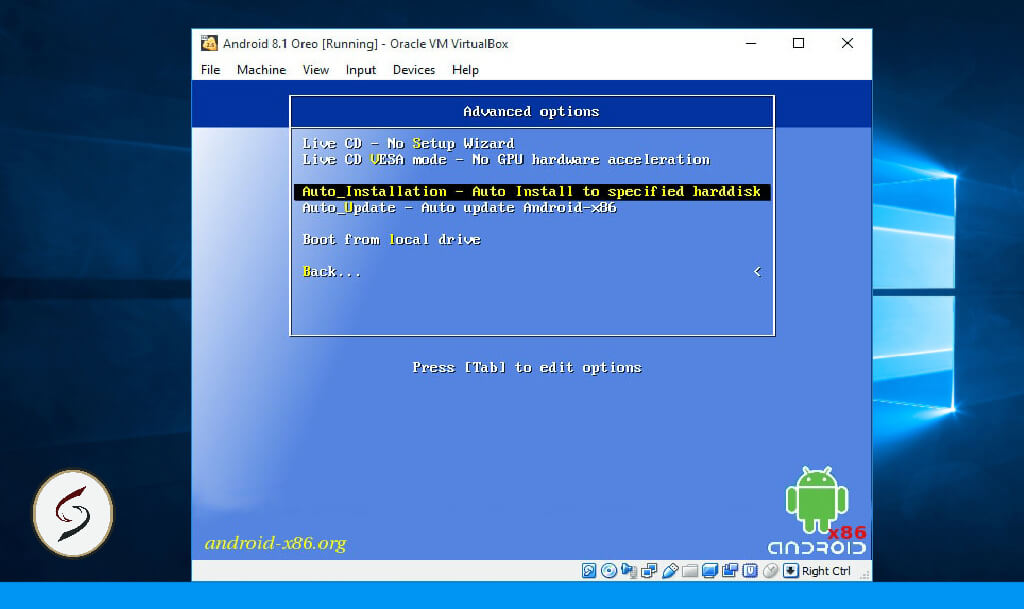
Inside the Advanced options… you will find some other options. There you will need to select Auto installation- Auto install to specified hard disk.
The system will notify you by warning you about formatting the VM. Select the, Yes and it will start the format procedure. The app will format it, extract and install all the import files required.
Another window will appear, click on Run Andorid-x86 or you can also select the Reboot. Then click on OK.
9- Change settings
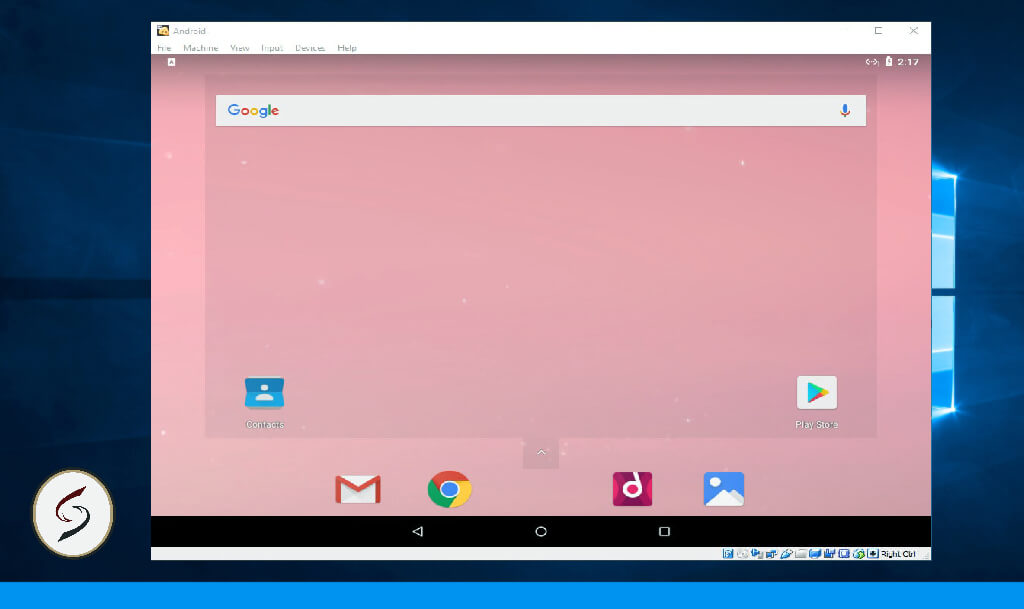
Your system will run Android on Virtual Box. There you will need to configure the following on your own:
- Language
- Wi-Fi
- Gmail
- Date and time
- Terms and conditions
Once these are configured, you are ready to use Android.
Features of Android
- Kernel 3.10.40, KMS enable
- Wi-Fi support with GUI
- Better disk installer
- Power Suspend/resume (S3 mode)
- Battery Status
- Software mouse cursor
- Mouse wheel
- Support netbook native resolution
- Audio (ALSA)
- V4l2 Camera support
- External monitor support
- External storage automount support
- Support external keyboard
- Debug mode with busy box
- Bluetooth
- G-sensor
In progress
- Android 9.0 (Pie) porting (pie-x86 branch)
- Upgrade kernel to 4.19 or newer
- OpenGL ES hardware acceleration for intel/Radeon/NVidia/AMD GPU (pstglia, Mauro) and virgl(robh) GPUs.
- HDMI audio
- Lineage OS integration
- Hardware-accelerated codecs
- Multiple displays support
- Better power management
- Miracast

