Comprehensive Tutorial on Resetting Your Windows 10 PC
Want to reset your Windows 10 PC without losing a single personal file? Well, this is going to help you for sure, as here we have guided you fully on resetting your Windows 10 PC.
Table of Contents
Reasons that might require a reset on your Windows 10 PC?

There are several reasons why you might consider resetting your Windows 10 PC. However; these are the most common ones:
Performance Issues: If your PC has become slow or unresponsive, resetting it can help to improve performance.
Virus or Malware Infections: If your PC has been infected with a virus or malware, resetting it can help to remove the infection and restore your PC to a clean state.
Software Conflicts: If you are experiencing software conflicts or issues, resetting your PC can help to resolve these problems.
Selling or Donating Your PC: If you plan to sell or donate your PC, resetting it is important to protect your personal data and ensure that the new owner starts with a clean slate.
Starting Fresh: Sometimes, you may simply want to start fresh with your PC and remove all the clutter and unnecessary files and programs that have accumulated over time. Resetting your PC can help you achieve this goal.
Reset this PC

Resetting a Windows 10 PC can be done in several ways, depending on your specific needs and preferences. Here are the most common methods:
Method 1: Reset via Windows Settings – without losing personal files
In this method, you are going to use the built-in tools to reset your Windows. This method is also the same as performing a factory reset on your Windows; minor changes are there while performing it. Before we continue any further, you are recommended to read the note given below:
Open the Start menu and click on the gear icon to access the Settings app.
Click on Update & Security.
Click on Recovery in the left-hand menu.

Under Reset this PC, click on Get started.
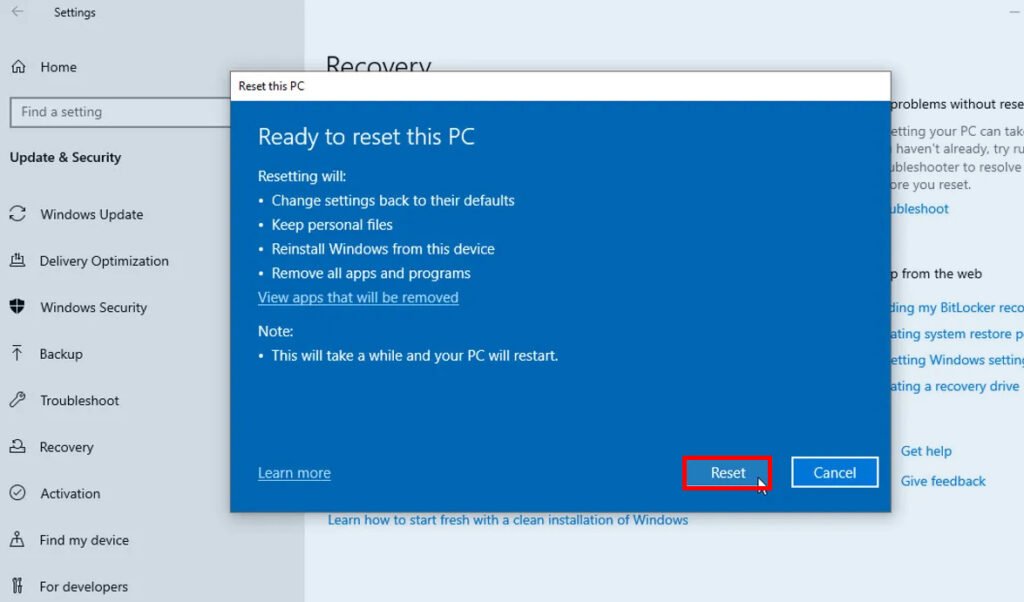
Choose whether you want to keep your files or remove everything, and follow the prompts to complete the reset process.

Choose the option Keep my files and follow the prompts to complete the reset process.
NOTE: During the reset process, Windows will reinstall itself and remove all apps and settings, but will keep your personal files, such as documents, pictures, music, and videos. However, any installed apps or programs will need to be reinstalled manually after the reset.
It’s important to note that if your personal files are stored in the same location as the operating system and applications, they may be deleted during the reset process. To avoid this, it’s recommended to store your personal files on a separate partition or external drive. Additionally, it’s always a good idea to back up your important files before performing any major system changes.
Method 2: Reset via Advanced Startup
In this method, you will reset your Windows without going through different phases as above.
Begin by clicking on the Start menu and selecting the power icon.
Hold down the Shift key and click on Restart.
Here you will restart and you will be soon placed in a new window. Now you will select Troubleshoot.
Click on Reset this PC and follow the prompts to complete the reset process. From here on, you will select options according to your and if you want to keep your files, then select the options. Once selected then you will start resetting your Windows 10 PC.
Method 3: Reset Windows 10 via Installation Media
Users who have a bootable USB or DVD of Windows 10 can use it to reset their PC. You can use this method to perform clean installation too.
If don’t have an installation media, you are recommended to either create one or get yourself one. Then we will proceed with the steps given:
Insert the installation media into your PC and boot from it.
Select your language preferences and click on Next.
Click on Install now.
Accept the license terms and click on Next.
Choose Custom: Install Windows only (advanced).
Select the drive where Windows is installed and click on Next.
Follow the prompts to complete the reset process.
Note: Before resetting your PC, it’s important to back up any important files or data to an external hard drive or cloud storage service. Also, make sure you have the necessary installation media or product key to reinstall Windows 10 after the reset process is complete.
Windows 10 prior to version 2004 or earlier
The process for resetting a Windows 10 PC without losing personal files prior to version 2004 is similar to the current version, with a few minor differences in the user interface. Here are the steps to reset a Windows 10 PC without losing personal files on a version prior to 2004:
Open the Start menu and click on the gear icon to access the Settings app.
Click on Update & Security.
Click on Recovery in the left-hand menu.
Under Reset this PC, click on Get started.
Choose the option Keep my files and follow the prompts to complete the reset process.
NOTE: During the reset process, Windows will reinstall itself and remove all apps and settings, but will keep your personal files, such as documents, pictures, music, and videos. However, any installed apps or programs will need to be reinstalled manually after the reset.
As with the current version of Windows 10, it’s important to note that if your personal files are stored in the same location as the operating system and applications, they may be deleted during the reset process. To avoid this, it’s recommended to store your personal files on a separate partition or external drive. Additionally, it’s always a good idea to back up your important files before performing any major system changes.

