How to Install Google Play on Windows 11?
Want to use Google Play on Windows 11? Well, this can help you to easily install Google Play on your Windows 11 within a few steps. Till now, Windows 11 has been provided on the beta channel to users who have signed Microsoft Inside Program.
On the release of Windows 11, support for Google Play was announced too. everyone got both surprised and excited; however, on using the Windows OS. soon everyone realized the absence of Google Play. After tons of works by the developers, here is the quickest and easiest way to install Google Play on Windows 11.
Related Topic: How to Upgrade from Windows 10 to Windows 11?
Table of Contents
How to Install Google Play on Windows 11?

Here we are not going to use Linux, or create a certain environment inside Windows 11, then create a script file for the installation. Instead, we are going to use Windows Subsystem for Android, ADBKit, and PowerShell for the installation. With these tools, you will avoid tons of works and can easily perform the installation. Personally, we loved this method the most.
Note: the installation will be made on a system with 64-bit only. You can’t run it on 32-bit systems, as Windows OS no longer supports 32-bit systems.
Enable Virtualization
The first step will be to enable virtualization. For this purpose, you will go to Control Panel > Programs > Turn Windows Features ON or OFF. There you will find Virtual Machine Platforms and Windows Subsystem for Linux, check the boxes beside them, and click on OK.
Note: if you have installed Windows Subsystem for Android (WSA) on your Windows 11, then you will need to uninstall it. For uninstalling it, you go to Start > All apps, select the application, and click on Uninstall. Or you can go to Control Panel > Programs and Features, select a program, and uninstall it.
Related Topic: Enable, Disable and Change Startup Sound on Windows 11
Enable Developer Mode

Here you will enable the Developer mode. for this purpose, you will go to Settings > Privacy & Security > For Developers. Under the Developers Mode, you will find Install apps from any source. Turn it ON and a pop-up will appear (Turn on developer mode) and click on YES.
Related Topic: How to Move Taskbar to Top in Windows 11?
Download Windows Subsystem for Android
In this step, you are going to download Windows Subsystem for Android (WSA) latest version. If you are using an ARM-based system, then you will need to use the second link.
Installation and patching with PowerShell
Now you will click on Start and type “PowerShell”. Once appeared, you will run it as administrator. Then you will go to the download folder on your system and find the WSA latest downloaded folder (you will find a zip file). If there is no zip, then you can skip extraction and the folder directly.
You will need to use third-party applications as WinRAR to extract all the files. Once the extraction is completed, then you will double click on the WSA-Patched folder and will paste the location of WSA-Patched in PowerShell’s command below:
Add-AppxPackage -Register C:\WSA-Patched\AppxManifest.xml’Note: you will need to replace the “C:\WSA-Patched\” with the location of the WSA-Patched folder on your system. Your command will look something like “Add-AppxPackage -Register C:\Users\SoftRaR\Downloads\WSA-Patched\AppxManifest.xml”.
Launch Windows Subsystem for Android
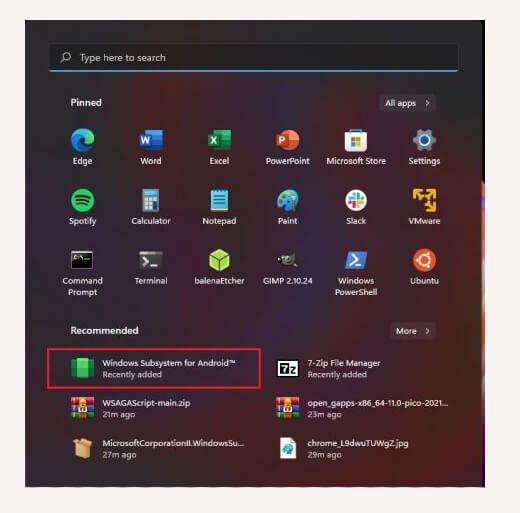
Go to the Start menu and run Windows Subsystem for Android. You will find the application in recommend applications in the Start menu.
In the window, you will click on Files for starting Windows Subsystem for Android (WSA). Soon a popup will appear on your screen by Windows Defender. Allow the Windows Defender Firewall by clicking on Allow Access.
Related Topic: Free Download Windows 11 Compatibility Tool
Fix Sign-in Error on Google Play in Windows 11
If you have reached then step, then you have completed most of the work. Both Google Play Store and Amazon AppStore can be found in the Start menu. However; you will experience errors on signing in. we recommend you avoid opening any of the play stores and start the repairing procedure.

First, you will download ADB Kit then will extract all the files inside.

Once all the extraction got completed, you will go to Windows Subsystem Settings and will turn ON the Developer Mode. toggle back to Windows Subsystem Settings, there you will find ADB can be connected on 127.0.0.1:58526 below the Developer Mode.
Run ADB Kit with Windows Terminal

Now you will open File Explorer and go to the ADB Kit folder that you have extracted earlier. Open the folder and right-click anywhere and you will see the Open in Windows Terminal option. Click on it and a terminal will open.
Related Topic: How to Get Windows 10 Explorer Back in Windows 11?
Command on Windows Terminal
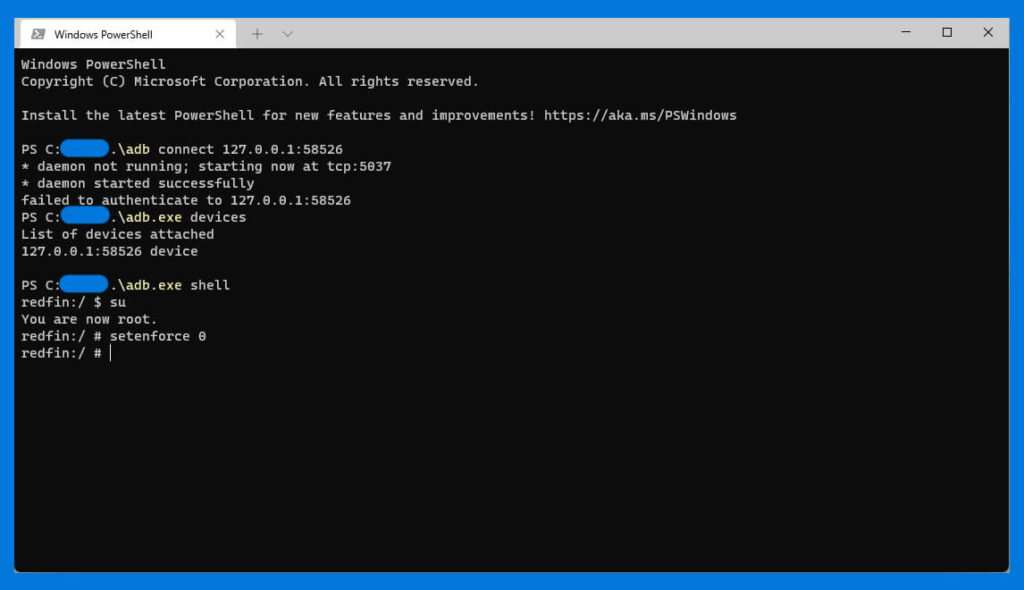
You are going to use the command below one by one. While using the command, you might experience errors on your screens. Ignore the error, until you see 127.0.0.1:58526 under the List of devices attached.
.\adb.exe connect 127.0.0.1:58526’
.\adb.exe devices
Here the second command is used to confirm the command given above. Again use the command below:
.\adb.exe shellThen you will use the command “Su” and you will see You are now root on your screen.
Run the command “setenforce 0” and your terminal should look like the picture below:
Enjoy your Google Play Store on Windows 11

Congratulation, you have successfully installed Google Play Store on your Windows OS. now, head to Google Play Store and Sign in with your Google ID. Sign in, download, and enjoy android applications on your Windows 11.
Related Topic: How to Get the Windows 10 File Explorer Ribbon in Windows 11?

