How to Create Windows 11 Bootable USB?
with the recent release of Windows 11 and all those new features, easy interface with numerous changes, Microsoft Windows 11 is really one of a kind. There are many who wants to install Windows 11 on their system; however, there are issues that are caused while upgrading, even without upgrading due to bugs or errors that cause users to reinstall the OS again.
For such occasions, you will need to create a bootable USB drive of Windows 11. As with a bootable USB, you can do installations on multiple systems.
Table of Contents
Tasks to creating the bootable USB?
Here are few things that need your attention before you start the procedure.
You will need to have 8 GB of a USB drive. Increasing the size to 16 GB will be better. Make sure that you don’t have any important files on your USB drive too, as all the files will be deleted.
Third-party application as Rufus is also required, as it will help us to burn the ISO on USB.
This will be the most important part, as you will need to check your system’s compatibility with Windows 11 too. As there are many systems that are not compatible with Windows 11.
Related Topic: Free Download Windows 11 Compatibility Tool
How to create Windows 11 Bootable USB?

We have divided the entire procedure into two different parts. There is the downloading section and there is the creation section.
Download Windows 11 ISO Image
Media Creation Tool was introduced with the release of Windows 10. However, there is no update for Windows 11 in Media Creation Tool. The only way Windows 11 is available for users is through Insider Program.
Unlike previous versions of Windows OS, you can’t use third-party applications as UUP Dump to download the setup file from the source too. So, here is how to download Windows 11 ISO Image. The same process can be used on Linux, macOS, and Windows OS (which we have used here).
Go to Microsoft Windows Insider Preview Download page. First, you will need to sign in with your Microsoft Account then you will need to sign up for the Insider Program. There is no cost to join the Insider Program.

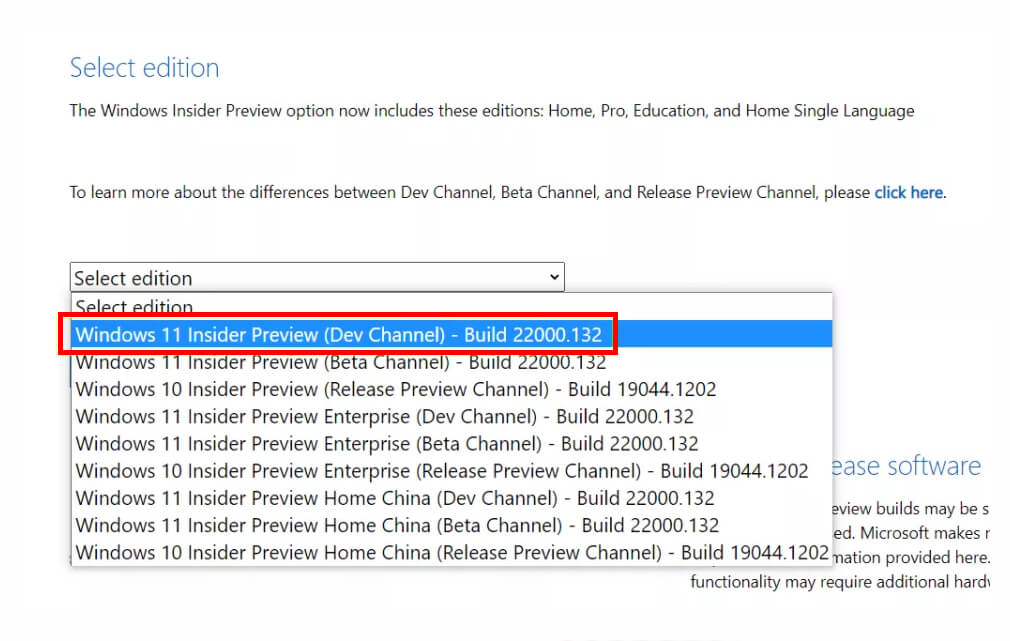
There you will need to select the edition of Windows 11 in the drop-down menu. Then you will need to select between Developers Channel or Beta Channel. The difference between the two channels are;
- Developers Channel is provided with frequent updates and is more likely to have more bugs or errors.
- Beta Channel is getting less updates and also has less bugs and errors as compared to Developers one.

Confirm the Channel and Confirm again. Select the 64-bit setup and click on Download.
Normally the setup size is about 5.1 GB and the downloading time will be dependent on your internet speed. If you don’t want to download from Insider Program, then you can download Windows 11 ISO Image from the direct links here.
Creation of Bootable USB of Windows 11
By now you have downloaded and installed Rufus on your system. Rufus has no installation, download the setup file and open it.
Plugin your USB drive into your system.
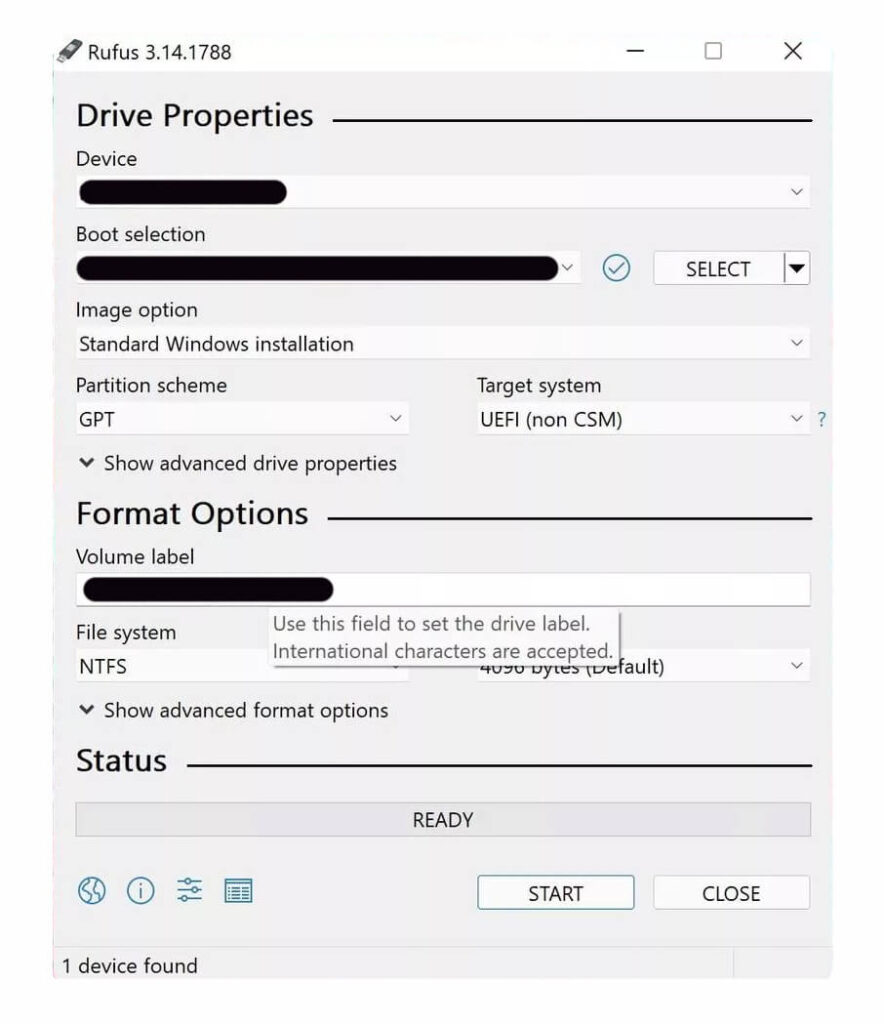
Now go to Rufus and select the USB drive in the Device drop-down section.
In the Boot Selection, you will need to select the ISO Image of your Windows 11 that you have downloaded previously.
For the Image option, select Standard Windows installation. In the Partition scheme and target system, you will need to select GPT and UEFI (non-CSM).
Note: Make sure you have selected File System NTFS and Allocation Unit Size to Default.

Name the USB drive to something that is related to Windows 11(naming the USB is optional, you can name it anything that you want). By any chance, if you are having difficulty with the formats then use the image given.

Here you will click on the Start button. Soon a new Warning window will popup, click on the OK button. The application will start burning the Windows 11 ISO Image to your USB drive.
Related Topic: How to Burn ISO to USB on Windows? Bootable USB

