How To Fix Windows Update Error 0x8024a105?
Windows Update plays a vital role in keeping your operating system secure and up-to-date with the latest features and improvements. However, encountering errors like the 0x8024a105 code can be frustrating, halting the update process and potentially leaving your system vulnerable.
In this guide, we will be exploring its underlying causes and providing a step-by-step roadmap to effectively troubleshoot Windows Update 0x8024a105 errors.
Table of Contents
What Causes Windows Update 0x8024a105?
The Windows Update error code 0x8024a105 is a common issue that users encounter when users are trying to update their Windows operating system. This error typically indicates a problem with the Windows Update service or its components. It could be caused by various factors, including:
- Corrupted Windows Update components: Over time, the components responsible for managing Windows Update might become corrupted, leading to errors like 0x8024a105.
- Network Connectivity Issues: If your network connection is unstable or unreliable, it can prevent Windows Update from downloading or installing updates correctly, resulting in this error.
- Software Conflicts: Third-party software, especially security programs like antivirus or firewall software, might interfere with the Windows Update process and cause errors.
- Incorrect System Date and Time: If your system date and time are not set correctly, it can interfere with the secure connection to Windows Update servers.
- Background Services: Some services and processes running in the background might interfere with the Windows Update service, causing the error.
- Windows Update Cache: Sometimes, the cached files related to Windows Update can become corrupted, leading to errors during the update process.
- Disk Space: Insufficient disk space on the system drive can prevent updates from being downloaded and installed.
Now that you know what causes the error, let’s fix the issue.
Fix Windows Update 0x8024a105 Error

Restart Your Computer
Restarting your computer can resolve issues caused by temporary glitches, conflicts, and pending updates. It clears temporary data, resets services, and refreshes the system state. While it might not fix complex problems, it’s a simple first step to troubleshoot minor errors like this.
Check Network Connection
Ensure you have a stable and reliable network connection. If you’re using a wireless connection, try connecting via Ethernet to rule out any Wi-Fi issues.
Check Date and Time Settings
Make sure your system’s date and time settings are accurate. Incorrect date and time can cause issues with secure connections to Windows Update servers.
To check date and time settings and enable auto-sync, here is what you are going to do;
- Open Settings and go to Time & Language.
- Select Date & Time and turn on Set time automatically.
- Now turn on Set time zone automatically and choose the correct time zone from the list.
- And at last, click on Sync now.
Now your system date and time will be automatically updated.
Run Windows Update Troubleshooter
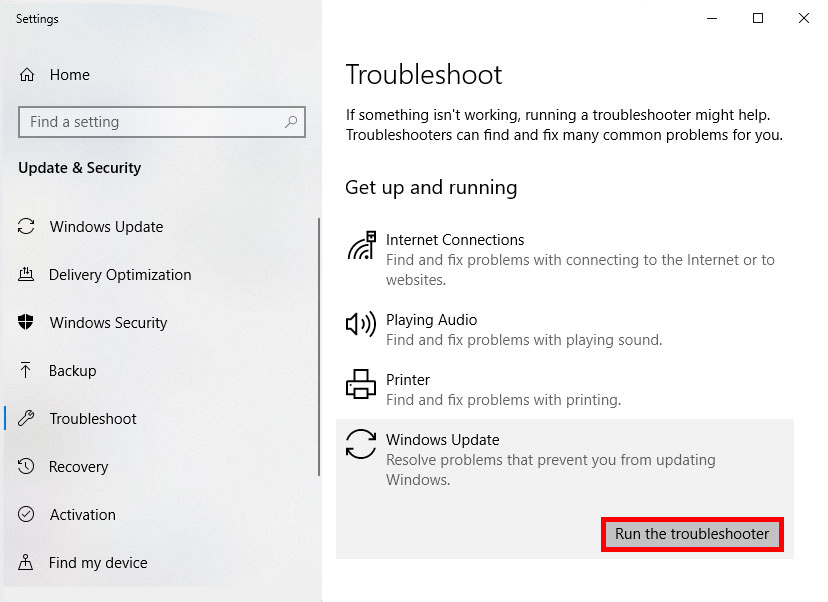
Windows has a built-in troubleshooter for Windows Update issues. Here’s how to run it:
- Open Settings from the Start menu. Go to Update & Security > Troubleshoot.
- Select Additional Troubleshooters and click on Windows Update.

Follow the on-screen instructions to run the troubleshooter.
While the process is simple, you can’t use it to fix the issue most of the time. The troubleshooter can fix simple errors but fails to fix the issue most of the time. And if the error code is not fixed on your system, then you will apply the next solution.
Disable Third-Party Software:
Temporarily disable third-party security software, such as antivirus or firewall programs, to see if they are causing conflicts with Windows Update. Here’s how to do it:
- Right-click on the security software icon in the system tray. Look for an option like Disable or Pause Protection.
- Choose the appropriate option and specify the duration (e.g., 15 minutes or 1 hour).
Attempt to run Windows Update again. If the issue got fixed then update your Windows OS else apply the next solution.
Note: Remember to re-enable your security software after testing.
Run the DISM Tool
The Deployment Imaging Service and Management Tool (DISM) can fix corruption issues in the Windows image files. Run these commands in Command Prompt with Admin rights:
Dism /Online /Cleanup-Image /CheckHealthDism /Online /Cleanup-Image /ScanHealthDism /Online /Cleanup-Image /RestoreHealthReset Windows Update Components
Resetting Windows Update components can resolve issues related to corrupted files or services responsible for Windows Update. It involves stopping relevant services, renaming temporary folders, and restarting services.
This process clears potentially problematic data and restores the update mechanism to a clean state, which can help overcome errors like 0x8024a105. It essentially gives Windows Update a fresh start by rebuilding its components. If the components were causing conflicts or errors, this procedure can help restore proper functionality.
Apply these steps to reset Windows Update Components.
Run CMD as administrator from the Start menu.
Then you will run the following commands one by one, pressing Enter after each:
net stop wuauservnet stop cryptSvcnet stop bitsnet stop msiserverAfter running all the commands to stop the services, you will rename a few folders. You are going to rename SoftwareDistribution and Catroot2 Folders. Now you will apply the commands given:
ren C:\Windows\SoftwareDistribution SoftwareDistribution.oldren C:\Windows\System32\catroot2 catroot2.oldAfter renaming the folders, you will start the services again. These are the services that you stopped earlier.
net start wuauservnet start cryptSvcnet start bitsnet start msiserverClose the Command Prompt window and restart your computer.
Free Up Disk Space
Freeing up disk space can resolve the Windows Update error 0x8024a105 by ensuring that there’s enough room for downloading and installing updates. If your system drive (usually C:) is low on space, updates might fail to download or install completely.
By deleting unnecessary files, uninstalling unused applications, and moving data to other drives, you create space for updates to operate without issues. Insufficient disk space can lead to incomplete updates, causing errors like 0x8024a105.
Perform a Clean Boot
A clean boot helps identify if a background process is causing the issue. Here’s how:
– Press Win+R, type “msconfig“, and press Enter.
– In the System Configuration window, go to the Services tab.
– Check Hide all Microsoft services and then click Disable all.
– Go to the Startup tab and click Open Task Manager.
– Disable startup items one by one by selecting them and clicking Disable.
– Close Task Manager and go back to the System Configuration window. Click OK.
Restart your computer. Now check again for any kind of error; if found again then you can either download the updates manually or you will reinstall your OS. We have provided the steps to perform both of them below:
Manually Download and Install Updates
If automatic updates fail, you can manually download and install updates from the Microsoft Update Catalog. Search for the specific update using its KB number and download the appropriate version for your system.
Reinstall the Current Windows OS
If all else fails, you might consider reinstalling Windows 10 or 11 to the latest version. This can help resolve deep-seated issues that are challenging to diagnose and fix.
Note: Before proceeding, ensure you have backups of your important files. Reinstalling the OS will result in data loss.
Create Installation Media
You’ll need a bootable USB drive or DVD with the Windows installation files. You can create this using the Media Creation Tool from Microsoft’s website or third-party application.
After creating, you will insert the USB drive or DVD into your computer.
Related Topic: Create a Bootable USB for Windows 11
Boot USB drive
Restart your computer and boot from the installation media. You might need to change the boot order in your BIOS settings to prioritize the USB drive or DVD.
Boot the USB drive and access the Windows Setup.
Install Window
Select your language, time, and keyboard preferences. Click Install Now.
Enter your Windows product key. If your Windows was previously activated, it might automatically activate during or after installation.
Select Custom: Install Windows only (advanced) to reinstall Windows on the same partition. Alternatively, you can choose to format the partition and perform a clean installation if you want to remove all data.
Follow the prompts to complete the installation. Your computer will restart multiple times during the process.
After installation, follow the on-screen prompts to set up your region, language, account, and other preferences.
If you have backups of your files, you can now restore your personal data and applications. And that is it, you have successfully reinstalled your Windows OS.
That is how you are going to fix the Windows Update 0x8024a105 error code. From what causes the error to fixing it; if you have any questions then comment down.
Related Topic: How to Fix Windows Update Error 0x80070424 on Windows 10?
Related Topic: How to Fix Error Code 0x80070002 in Windows Update?
Related Topic: How to Fix Windows Update 0x8007007f Error Code on Windows 11?

